Now that we’ve verified our serial I/O is working under Linux, we can up our build environment and do some serial output ourselves.
Setup a Build Environment
Install Ubuntu 14.04 LTS
I’m using Ubuntu 14.04.4 Desktop (64-bit) as my build environment. While I expect newer versions to work fine, I can’t guarantee that will be the case. If you’re using something other than Ubuntu as your normal OS, install it in a virtual machine (VM). I use VirtualBox. Installation instructions for VirtualBox as well as installing an Ubuntu VM within VirtualBox are here. I typically setup my virtual machine to have 8GB of storage, 4GB of base memory and 128MB of video memory as well as enabling 3D acceleration in the video settings. I also install the VirtualBox guest additions so I can run it full-screen and enable bi-directional clipboards so I can copy & paste between my desktop and my VM. These aren’t necessary, but convenient.
Install a Cross Compiler
Our build environment is running an Intel 64 bit CPU (x86_64). Our target (the Raspberry Pi 3 Model B) is running a 64 bit ARM CPU (Aarch64). The compilers that come with our build environment can only generate instructions targeted for the x86_64 running a Linux operating system. In order to generate Aarch64 instructions, we need to install a cross compiler. A cross compiler runs on one type of CPU architecture and operating system but generates code that runs on a different CPU architecture and operating system.1
The nomenclature used by GCC to specify a target is called a target triplet in the form machine-vendor-operatingsystem. I’d love to say that it’s called that because it always consists of three (triple) names separated by dashes that uniquely define the target, but – sadly – there are also doublets as well as triplets that look remarkably like quadruplets. Sigh. Read the link to target triplets I provided if you want to know more. All you really need to know to follow along here is that our target “triplet” is aarch64-linux-gnu. So let’s go ahead and install the GCC cross compilers for aarch64-linux-gnu. Open a CLI terminal (click the swirly icon in the upper right corner of your screen, type terminal in the search box, and click the Terminal program) then enter the following at the dollar-sign ($) prompt:
sudo apt-get install gcc-aarch64-linux-gnu g++-aarch64-linux-gnu -y
You’ll have to enter your password after doing this since you’re running the apt-get program as an administrative user. You might also want to right click on the Terminal icon on the launcher bar (on the right side of your screen) and select Lock to Launcher. That way it will be readily available the next time you want to open a CLI.
We’re going to be grabbing some code from GitHub, so let’s also install git in order to pull down code repositories:
sudo apt-get install git -y
That’s it for now in regard to your build environment. “Wait. Where’s Rust?”, you might wonder. We’re going to install that later; our first builds will only require a C compiler.
Building Your First Kernel
The Raspberry Pi is a bit of an interesting beast when it comes to startup. Most desktop computers and many embedded computers have some of sort code that the CPU executes when you apply power. The Raspberry Pi takes a different approach: it executes multiple stages of code using only its GPU. The following image that I found at StackExchange is quite helpful2:
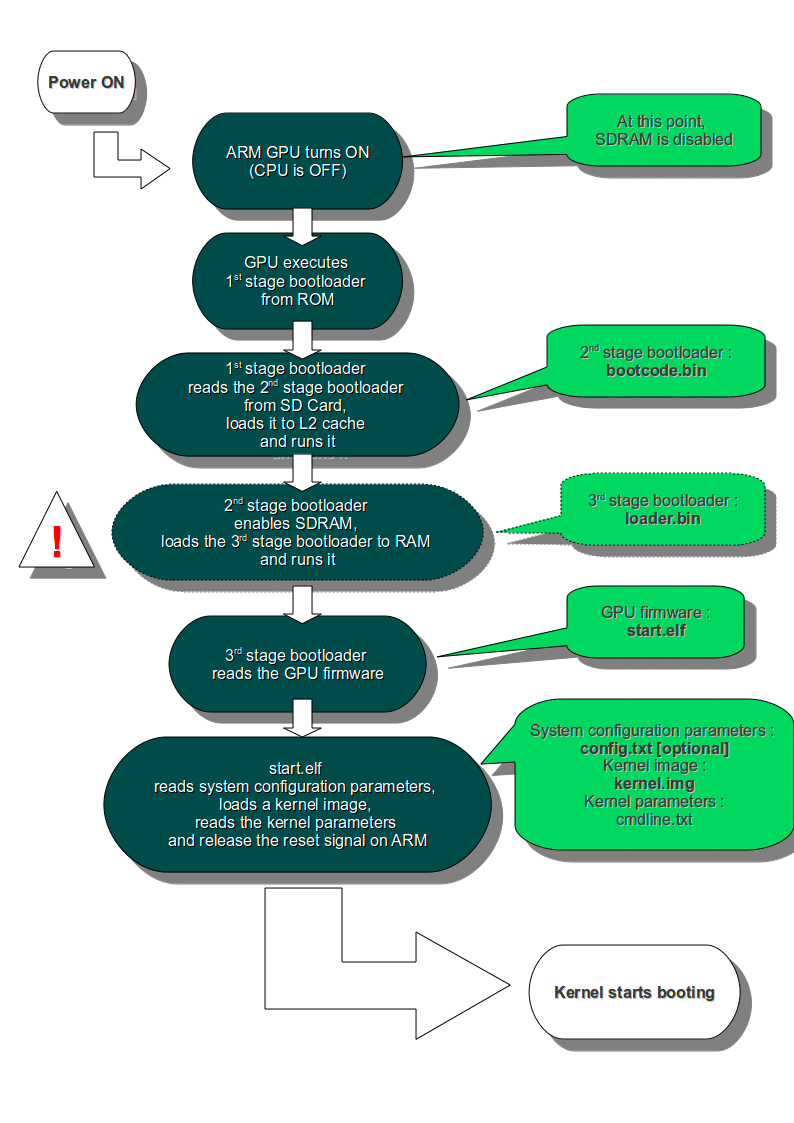
According to the discussion at StackExchange, the 2nd stage bootloader step (where loader.bin gets loaded) doesn’t happen anymore, but the point remains the same: you have to have several files on your Micro SD card in addition to your kernel. Not only that, those files have to be compatible with your specific model of the Raspberry Pi. The 3B is new enough that there’s not a lot of documentation floating about and loading your own 64-bit kernel isn’t the most straightforward task. Fortunately, Stephen Warren (@swarren) has put together an extremely simple demo. Let’s grab a copy of his code:
git clone https://github.com/swarren/rpi-3-aarch64-demo.git
Now you should have a directory named rpi-3-aarch64-demo in your home directory. In addition, you’re going to need to download the updated bootloader files. Just save the zip file to your Downloads folder for now.
Next, we’ll mount the Micro SD card that we setup in the previous post. Go ahead and plug it into your computer using whatever method you used when you created it. If you’re running a VM, you’ll have to let the VM host software (VirtualBox in my csae) know that you want that USB device to be connected to your machine. To do that in VirtualBox (check your documentation for other VM software), go to the top menu bar on your virtual machine, click Devices and hover over the USB entry. A submenu of possible USB devices will come up. The one you want may or may not have a meaningful name, but it should end with [0100]. Select the appropriate device and you should have two Thumbdrive icons appear in your launcher bar named boot and 4.0 GB Volume. The boot volume is formatted in FAT32 format (a common thumb drive format). The other one is the full Raspbian installation in a format that Linux understands, which is why it shows up in Ubuntu. You typically won’t see it on Windows or Mac OS unless you’ve added extra drivers to them.
Let’s pause for a couple of helpful tips:
-
If you’re using a VM for this, you’re going to get tired very quickly of having to do the Devices->USB->Possibly Meaningless Name [0100] selection. VirtualBox (and I would think other VM software) allows you to configure your VM to automatically route that USB device to your virtual machine. Go to the VirtualBox program, click on your VM on the left side of the window, click the Settings gear at the top, then click the Ports icon, and select the USB tab. There will be an empty box titled USB Device Filters. Click the + icon on the right and select your Micro SD card from the list. Now click the OK button. From now on, your drive will automatically mount to your VM whenever you plug it into your computer.
-
Unity (which, as far as I can tell, has caused anything but unity) in Ubuntu 14.04 has a horrible default behavior when it comes to external drives being plugged in: it opens a window for every partition on the drive. That in and of itself might not be the worst thing in the world, but when you eject the drive, it leaves those windows open. Still not the end of the world. But when you plug the drive back in, it opens a new set of windows leaving the old ones there. I personally dislike this behavior a lot. If you’d rather not have to close two windows every time you put a new build on your Micro SD card, run the following command from the terminal:
gsettings set org.gnome.desktop.media-handling automount-open false
Now we’re going to mess with a bunch of files on the boot partition. Getting these wrong will keep you from booting your 3B. In as much as you could recreate the whole thing, it’s a lot simpler to make a backup.
cp -rp /media/$USER/boot .
That makes creates a full copy at $HOME/boot.
Now let’s get the new bootloader files installed:
cd /media/$USER/boot
unzip ~/Downloads/firmware_armstub.zip
When unzip prompts you, select the [A]ll option by pressing uppercase A and hitting the Enter key.
Next we’ll delete some files we don’t need:
rm armstub*.bin kernel*.img
Now we’re ready to build the demo code we cloned with git.
cd ~/rpi-3-aarch64-demo/64
./build.sh
The build script compiled an assembly source code file, a C source code file, and then combined them into a file called app.bin. We’re going to copy the app.bin file onto our boot partition but name it kernel8.img. We’re also going to copy over the config.txt file found in this directory (you can see the contents of a directory using the command ls).
cp config.txt /media/$USER/boot/.
cp app.bin /media/$USER/boot/kernel8.img
Now right click on either of the thumbdrive icons and select Eject parent drive. When they’ve disappeared from the launcher, pull out your Micro SD card, and put it in your 3B. Now plug in your USB-TTL adapter and connect to it with your serial console program (if you’re going to be connecting to your USB-TTL adapter using your VM, now would be a good time to add it to your USB filter list just like you did (?) with the Micro SD card).
If you took my advice and didn’t connect the red wire, your 3B should still be powered off. IF YOU IGNORED MY ADVICE AND CONNECTED THE RED WIRE, DO NOT PERFORM THE NEXT STEP!!! DAMAGE TO YOUR 3B MAY OCCUR!!!. Now plug in the micro USB cable to power up your 3B. If everything went well, you should see this on your serial console:
Hello, world!
this_cpuid:0
MPIDR:0000000080000000
r0:0000000000000100
r1:0000000000000000
r2:0000000000000000
r3:0000000000000000
CurrentEL:8
SPSel:1
Hooray! If you aren’t seeing this, go back through the preceding steps carefully and make sure you did everything right. If you’re still having problems, leave a comment here and I’ll do my best to help you out. Also, if you find I’ve made a mistake in this directions, you can leave a comment here or open an issue at GitHub.
Kernels: What are they?
Up to this point, there’s been a fair amount of magic going on. Now comes time to explain what the code from @swarren is doing. Let’s look at the file named start.S first. It’s purely ARM assembly code and is the first thing executed by the CPU after the bootloader loads it up and starts the CPU running.
.globl _start
_start:
	ldr x5, =0x00100000
	mov sp, x5
	bl app
hang:
	b hang
The first two lines are just instructions to the assembler telling it to keep track of the label _start and to make it available outside of the generated object file during the build process. The next two lines load the number 0x0010_0000 (hexadecimal for 1_048_576) into the CPUs register named x5 and then moves that value from x5 into the stack pointer sp. So, “load register x5 with 0x0010_0000” and “move the contents of x5 into the stack pointer”. This initializes the CPUs stack pointer to an area of RAM that isn’t being used.
The next line jumps to the instruction that’s labeled with app. It’s not in this file, so we won’t worry too much about that for the moment. But it does more than just that: bl means “branch with link”. The branch part just means “goto”. The link part loads the address of the next instruction after it into the link register lr, which is also known as register fourteen (r14). This will matter to us later.
Finally, there’s a label named hang and an instruction that tells the CPU to goto the address labeled hang, which in this case causes the CPU to keep doing the same thing repeatedly, or “hang”.
Let’s go see where where bl app took us. In the file named app.c, there’s a routine3 toward the bottom named app. I’ve condensed it a bit to focus on the parts we care about.
void app(uint32_t r0, uint32_t r1, uint32_t r2, uint32_t r3)
{
  static int this_cpuid = -1;
  uint64_t v;

  /* some other code is omitted here */

  dbg_puts("Hello, world!\r\n");
Our main routine here is named app which is where our missing symbol is in the start.S file. This is where the CPU is jumping to via the bl app instruction. The code declares some variables to work with (one of which might be stored in our stack, which is why we initialized the stack pointer), does a few things in the omitted area, and then calls a routine named dbg_puts which outputs a string to the serial console. The rest of the code after that does mostly the same thing (aside from some “mystery code” at the end that we won’t worry about) and the routine finishes with:
while (1) {
}
This just loops at that spot forever. Had it not been there, it would have returned to the next instruction after our bl app instruction in start.S. The way the CPU knows how to get there is because we stored that address in our link register (lr). It’s actually a bit more complicated than that, but it’s essentially true that the link register is what tells the CPU where to return to when it executes a return (ret) instruction. And this is why we have the b hang instruction: if our app routine had actually returned rather than looping, the CPU would continue on its merry way, trying to execute whatever values happened to be in memory after our start code. That could be a bad thing.
Now let’s see what calling dbg_puts actually does. The dbg_puts routine just calls the routine bcm283x_mu_serial_putc repeatedly with every character in the string “Hello, world!\r\n”, so we’re going to skip straight to bcm283x_mu_serial_putc.
static void bcm283x_mu_serial_putc(const char data)
{
struct bcm283x_mu_regs *regs = (struct bcm283x_mu_regs *)BCM2835_MU_BASE;
/* Wait until there is space in the FIFO */
while (!(readl(®s->lsr) & BCM283X_MU_LSR_TX_EMPTY))
;
/* Send the character */
writel(data, ®s->io);
}
The first line overlays a structure at the address defined by BCM2835_MU_BASE. The 3B actually has a Broadcom 2837 chip in it (BCM2837), but this particular structure mostly matches the 2837. We’ll take a closer look at the structure as well as that address definition later; for now, all you need to know is that it gives us some handy pointers to a couple of I/O registers on the chip. The first one is the LSR (Line Status Register). It, not surprisingly, tells us the status of the serial line. If the 6th bit from the right (bit 5, counting from 0) in that register is a zero (0), it means the UART is busy and can’t accept any more data. So the while loop sits and spins reading the value of the register using the readl routine waiting for the bit to switch to a one (1). If the bit is a one, it then calls the writel routine, passing in the character to send along with the address of the I/O register.
If you look at the rest of the code, readl and writel aren’t actually routines; they’re macros that call other macros. All they do is tell the compiler to make sure that it actually does what we’ve told it to do. Compilers can be too smart for their own good, particularly when dealing with hardware. From the compiler’s perspective, you’re reading the same piece of memory repeatedly in the while loop – since it has no reason to think that location is going to change since the last time it was read, it could easily optimize it away and only read it once. Plus, as far as it can tell, the data read from it isn’t used for any reason; again, another reason for it not to generate any code. So when dealing with the registers, we let the compiler know that they’re volatile, meaning their contents can change from outside of the code that’s executing.
Now let’s take a look at the start of the file that tells the linker how to put our generated code together into one piece. That’s located in app.lds.
OUTPUT_FORMAT("elf64-littleaarch64", "elf64-littleaarch64", "elf64-littleaarch64")
OUTPUT_ARCH(aarch64)
ENTRY(_start)
SECTIONS
{
	. = 0x00080000;

	. = ALIGN(8);
	.text :
	{
		start.o (.text*)
		*(.text*)
	}
The OUTPUT commands tell it about our target architecture and the ENTRY command tells it where our starting point for the code is going to be. The SECTIONS command tells it how we want our generated code organized. The first line tells the linker that we want our following commands to start at address 0x0008_0000. Then there’s a command to tell it to align our address to the next 8-byte boundary (it already is). The .text section’s most important part is to tell the linker to put the start code at the very beginning. Then the other .text object (the other code) can come after it. The rest of the file tells it where to put all the strings we defined and where global variables should be stored and so forth.
Finally, let’s look at the build.sh file.
CROSS_COMPILE=aarch64-linux-gnu-

${CROSS_COMPILE}gcc -c -o start.o start.S
${CROSS_COMPILE}gcc -c -std=gnu99 -Wall -o app.o app.c
${CROSS_COMPILE}ld -Bstatic --gc-sections -nostartfiles -nostdlib -o app.elf -Ttext 0x8000 -T app.lds start.o app.o
${CROSS_COMPILE}objcopy --gap-fill=0xff -j .text -j .rodata -j .data -O binary app.elf app.bin
The first line defines a variable that we’ll use later. You’ll notice it’s the same as our target triplet with a hyphen on the end. The native GNU compiler is called gcc, the native linker is ld, etc. The cross compilers are all of the same names but prefixed by the triplet plus a hyphen. So the second line is calling the GNU C cross compiler and assembling our start.S file (it knows it’s an assembly file because of the .S extension) and outputting it in object format to the start.o file.
The next line compiles our C source code and outputs the result into the app.o object file. Then the linker is called. Points to note are the -nostdlib option which tells it not to link in any of the C standard libraries (since we don’t have an operating system for it make calls to) nor to include the standard C start files since they would conflict with our code (we want to be the only code running, plus the linker would expect there to be a label named _main which we don’t have). The -Ttext option tells the linker to remap our text section to 0x8000 because that’s where the bootloader is expecting the kernel’s starting point to be. The output of the linking process ends up in app.elf, which is in ELF format. The bootloader is expecting a flat file rather than ELF – which has a lot of directives in it telling a loader where to put various things as well as extra information pertaining to section names and so forth – so the objcopy command flattens the ELF file and outputs the result to the app.bin file.
Wow. That was a lot to go over. I was hoping to get to the start of our own program, but this has gone far longer than I expected and, honestly, I need some sleep. Next time, we’ll strip Stephen’s code down to a very small sample and then get started with Rust.
As always, comments and corrections are welcome. Given how much information is in this post, I’ll be really surprised if there aren’t any glaring errors4.
Footnotes
-
This isn’t strictly true since we could, for example, cross compile a 32-bit x86 Linux program that could run on our 64-bit x86 Linux system. But you get the general idea. ↩
-
The image was contained in an answer to this question on the Raspberry Pi stack. ↩
-
In C, it’s actually called a function rather than a routine. I’m going to use routine since a function really should return a value and in C a void function doesn’t. I really only added this footnote to reduce any pedantry in the comments. Hopefully it doesn’t start a flamewar. ↩
-
Edited on 05/12/2016 23:00MST for a bunch of glaring errors and typos. ↩